
Recursively defined geometrical structures may be useful in engineering applications such as broadband antennas and metamaterials, to mention a few. For a brief overview of some applications, check out a previous blog post on fractals. In this blog post, we will take a look at how to quickly generate such geometry objects by algorithmic means.
Using Methods and the Application Builder for Recursively Defined Geometry Objects
You can use the Method Editor in the Application Builder for creating methods that perform almost any type of modeling task, including geometry modeling. It is easy to miss the fact that methods can support recursion by having a method calling itself in a recursive loop.
Here, we will demonstrate recursion by two famous examples of recursive structures: a Sierpinski carpet in 2D and a Menger sponge in 3D. The code for these examples are short enough so that we can list them in full, and there are links to download these examples at the end of the post.
Sierpinski Carpet
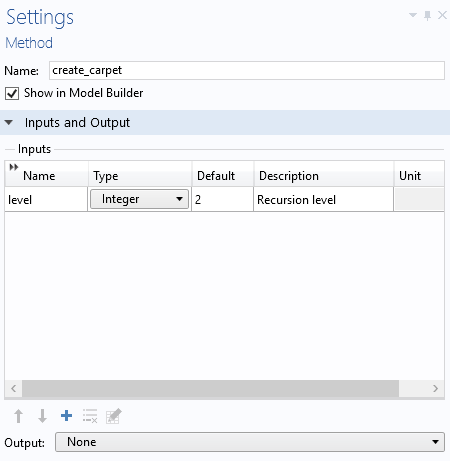
The following method, create_carpet, runs the recursion to a certain recursive level according to an input parameter level. It sets a limit at 5 levels in order to avoid creating an exceedingly large geometry. (You can change this if you think your computer can handle it.)
if (level < 1)
  error("Carpet level needs to be at least 1.");
if (level > 5)
  error("Carpet level needs to be at most 5.");

counter = 0;
model.component("comp1").geom("geom1").feature().clear();
model.component("comp1").geom("geom1").autoRebuild("off");
double cx0 = 0, cy0 = 0;
double si0 = 1;
carpet(level, cx0, cy0, si0);
model.component("comp1").geom("geom1").runPre("fin");
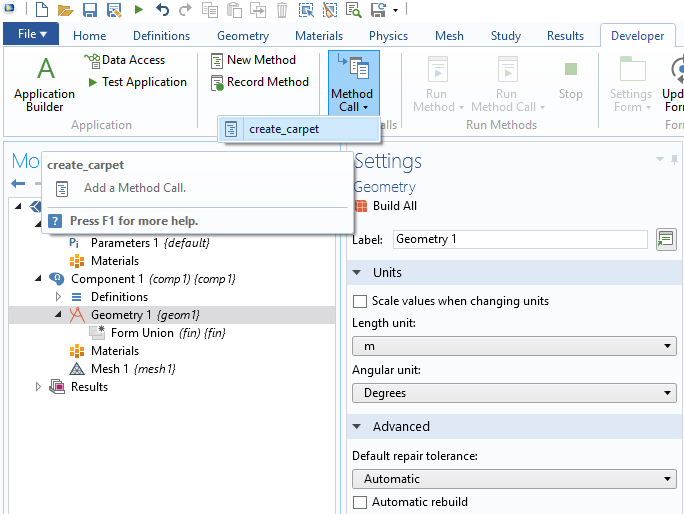
The input argument level is defined in the method’s Settings window, as shown below.
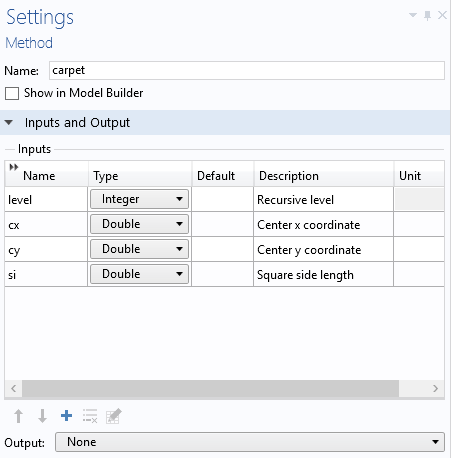
The method create_carpet, in turn, calls the main recursive function carpet, listed below, using four input arguments for the recursion level, the center x- and y-coordinates, and the current side length.
The input arguments are defined in the method’s Settings window, as shown below.
This is the code for the method carpet:
int l = level;
double posx, posy, si1;
String strix;
int l1;
for (int i = 0; i < 3; i++) {
  for (int j = 0; j < 3; j++) {
    posx = cx+i*si-si;
    posy = cy+j*si-si;
    strix = toString(i)+toString(j);
    if ((Math.abs((i-1))+Math.abs((j-1))) > 0) {
      if (l == 1) {
        counter = counter+1;
        model.component("comp1").geom("geom1").create("sq"+strix+"C"+toString(counter), "Square");
        with(model.component("comp1").geom("geom1").feature("sq"+strix+"C"+toString(counter)));
          set("base", "center");
          set("size", new double[]{si});
          set("pos", new double[]{posx, posy});
        endwith();
        model.component("comp1").geom("geom1").feature("sq"+strix+"C"+toString(counter)).label("Square"+strix+"C"+toString(counter));
      } else {
      l1 = l-1;
      si1 = si/3;
      carpet(l1, posx, posy, si1);
      }
    }
  }
}
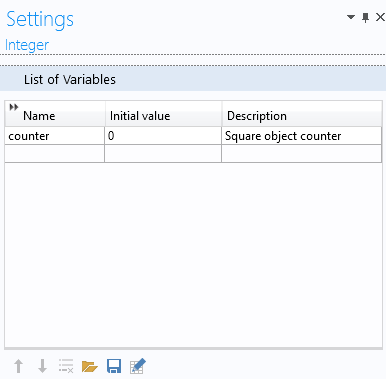
Note that in order to get a consecutive numbering of the square objects, an integer variable counter is used (under Declarations), as shown below.
The code for the two functions are shown below, side by side, in the Method Editor:

In order to run create_carpet, you first add it as a Method Call. The corresponding menu button is available in the Developer tab.
Once added, you can change the recursion level and click the Run button.
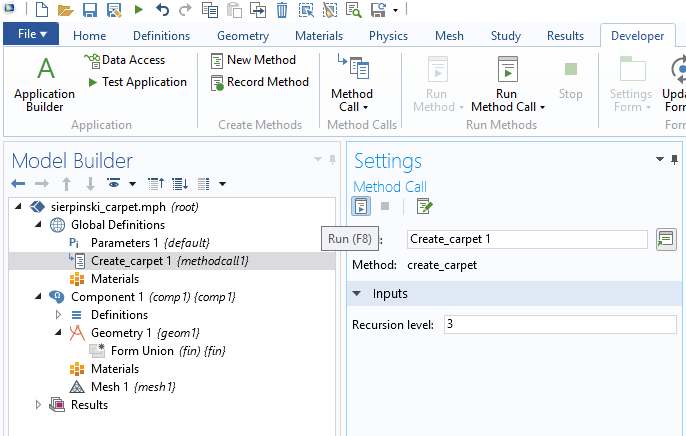
The figure below shows the resulting geometry for a level 3 carpet.

Note that the number of square geometry objects defined for the level 3 carpet is 512. The number of geometry objects for a level N carpet is 8N. This means that, for the maximum level 5 set by the method create_carpet, the resulting geometry has 32,768 geometry objects! If you try a level 5 carpet, make sure you have a powerful enough computer!
Menger Sponge
We have gone over a recursively defined geometry object in 2D, but what about 3D objects? The 3D version of a Sierpinski carpet is called a Menger sponge. The methods for the Sierpinski carpet readily generalize to 3D. However, in 3D, you need to be careful not to generate more objects than your computer can handle.
The following method, create_sponge, initiates the recursion.
if (level < 1)
  error("Sponge level needs to be at least 1.");
if (level > 3)
  error("Sponge level needs to be at most 3.");
counter = 0;
model.component("comp1").geom("geom1").feature().clear();
model.component("comp1").geom("geom1").autoRebuild("off");
double cx0 = 0, cy0 = 0, cz0 = 0;
double si0 = 1;
sponge(level, cx0, cy0, cz0, si0);
model.component("comp1").geom("geom1").runPre("fin");
The method sponge, shown below, is called by the method above and recursively creates a Menger sponge.
int l = level;
double posx, posy, posz, si1;
String strix;
int l1;
for (int i = 0; i < 3; i++) {
  for (int j = 0; j < 3; j++) {
    for (int k = 0; k < 3; k++) {
      posx = cx+i*si-si;
      posy = cy+j*si-si;
      posz = cz+k*si-si;
      strix = toString(i)+toString(j)+toString(k);
      if ((Math.abs((i-1))+Math.abs((j-1))+Math.abs((k-1))) > 1) {
        if (l == 1) {
          counter = counter+1;
          model.component("comp1").geom("geom1").create("blk"+strix+"C"+toString(counter), "Block");
          with(model.component("comp1").geom("geom1").feature("blk"+strix+"C"+toString(counter)));
            set("base", "center");
            set("size", new String[]{toString(si), toString(si), toString(si)});
            set("pos", new double[]{posx, posy, posz});
          endwith();
          model.component("comp1").geom("geom1").feature("blk"+strix+"C"+toString(counter)).label("Block"+strix+"C"+toString(counter));
          } else {
          l1 = l-1;
          si1 = si/3;
          sponge(l1, posx, posy, posz, si1);
        }
      }
    }
  }
}
The figure below shows the resulting geometry for a level 2 sponge.

In this case, the number of geometry objects grows with the level N as 20N, and the level 2 sponge shown above has 400 block geometry objects.
You don’t have to use recursion to create this type of structure, as demonstrated in a previous blog post on an iterative approach to creating a Koch snowflake.
If you have any of the add-on products for additional CAD functionality, you can export these geometry objects on standard CAD formats. Without an add-on product, you can still export the meshed geometry to any of the supported mesh formats, such as STL.
Next Step
Try the models featured in this blog post by clicking the button below, which will take you to the Application Gallery.


Comments (2)
Bernhard Valentini
July 18, 2019Please remove the programming errors from your example code.
Bjorn Sjodin
July 18, 2019Hi Bernhard,
Thanks for spotting the copy-and-paste errors. It has now been fixed.
Bjorn