Learning to Use General-Purpose, Time-Saving Features
In COMSOL Multiphysics®, there are many features and functionality that enable you to more quickly perform actions or tasks in the software, customize aspects of the user interface like buttons in toolbars, and generally expedite the model building process. In this article, we introduce you to some of these features of the user interface.
Using the Go to Source Button
One option to move around in the model tree is to use the Go to Source button. This button appears next to lists where you can select, for example:
- The dataset to use in a plot group
- The solution to use in a dataset
- The study step that defines the settings for a solver
- A common model input used as the value for a material property in a physics interface
Clicking the Go to Source button moves the focus from the node with that button to the node that contains the source selected in the list that the Go to Source button belongs to. For example, as shown in the following images, when you click the Go to Source button next to the Dataset list in the Settings window for the Stress (solid) plot group, the focus moves to the Study 1/Solution1 (1) dataset node under Datasets above the plot group in the model tree.
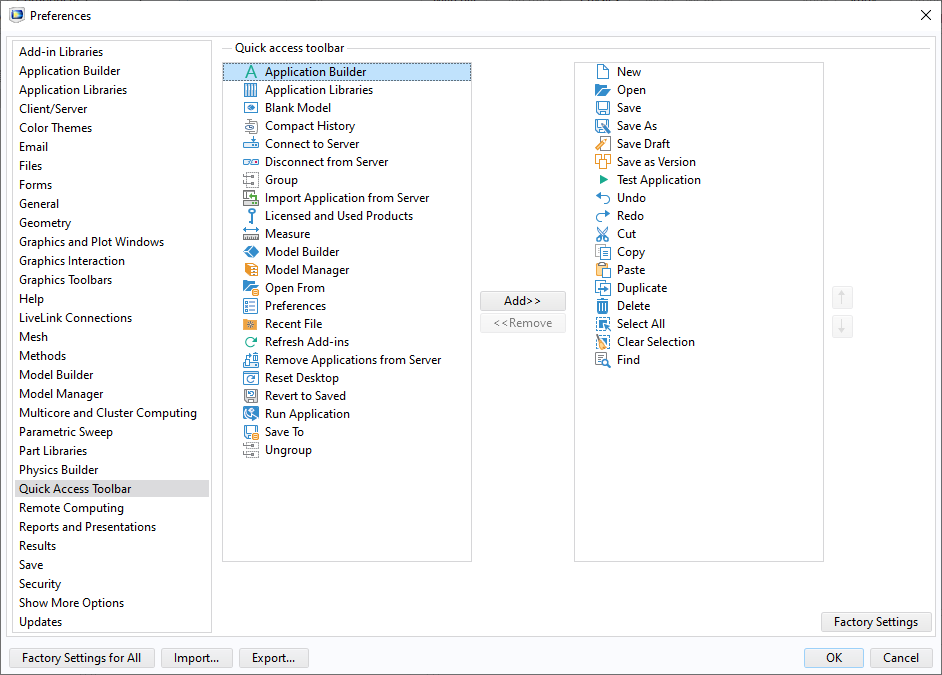
The Quick Access Toolbar
The Quick Access Toolbar appears at the very top of the COMSOL Desktop® and contains a customizable set of buttons for common operations, such as New, Open, Save, Undo, Redo, Copy, Paste, and more. As of COMSOL Multiphysics® version 6.0, there are options available for the Model Manager to switch between workspaces and for refreshing add-ins. To customize the set of buttons on the Quick Access Toolbar, click the down arrow to the right of the toolbar to open the Customize Quick Access Toolbar menu. You can then right-click the Quick Access Toolbar; choose Show Quick Access Toolbar Below the Ribbon, for example, from a set of standard buttons; and add more commands.
When you choose More Commands, the Quick Access Toolbar dialog box appears. In the dialog box, you can choose commands to add or remove from the Quick Access Toolbar using the Add>> and <<Remove buttons, respectively. When you select a command button in the set of active commands to the right, you can use the up and down arrow keys to change the order of the buttons.

The Quick Access Toolbar in COMSOL Multiphysics® version 6.0, with some customizations applied.
 A closeup view of the Quick Access Toolbar in COMSOL Multiphysics® version 6.0
The Preferences page for the Quick Access Toolbar, as shown in COMSOL Multiphysics® version 6.0. The page is used to add, move, and rearrange the buttons in the Quick Access Toolbar.
Although most of the buttons in the Quick Access Toolbar have predefined keyboard shortcuts, such as Ctrl+S for Save or Ctrl+Z for Undo, you can also activate numerical keyboard shortcuts for the Quick Access Toolbar. To do so, press the Alt key. Numbers representing each button then appear (see the following image). Press the corresponding number keys to activate the command for that button.

Press the Alt key to display the keyboard shortcuts for the Quick Access Toolbar. Then, for example, press 2 to open a new model file.
Double-Clicking to Quickly Add Features
In many situations where you are adding something to a model, such as a physics interface, study, or material, simply double-click the item that you want to add. It is then added directly to the model tree without the need to click the Add to Component button, for example. In the Model Wizard, double-clicking a physics interface on the Select Physics page adds it to the list under Added physics interfaces without the need to click the Add button. On the Select Study page, double-clicking a study adds it under Added study and exits the Model Wizard without the need to click the Done button.
Preference for Unit System in New Models
If you often use a unit system other than SI, you can alter the In new models preference in the Preferences dialog box so that new models always use the unit system you choose.
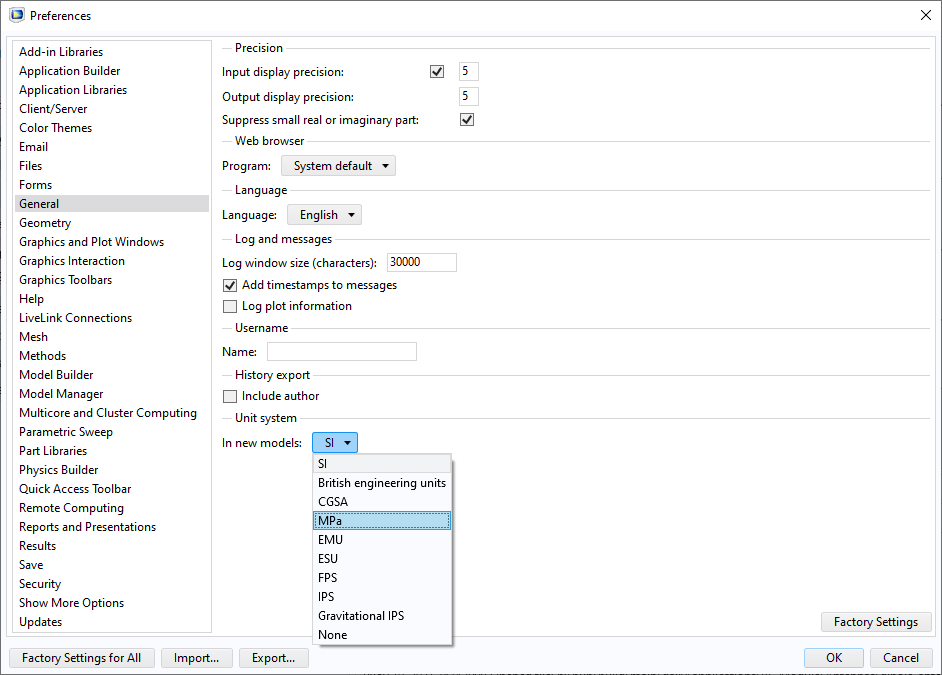 A closeup view of the Preferences window showing the General settings with the Unit system drop-down menu.
The unit system setting in the Preferences dialog box.
A closeup view of the Preferences window showing the General settings with the Unit system drop-down menu.
The unit system setting in the Preferences dialog box.
Compact Save
For large models, saving the computed data with the model takes up a lot of storage space. Options are available as of COMSOL Multiphysics® version 6.0 that prevent built, computed, and plotted data from being saved but retain the data in the current session as long as the model remains open. There are also separate options for when you are storing the model as an MPH-file, and when you are storing it in a database using the new Model Manager.
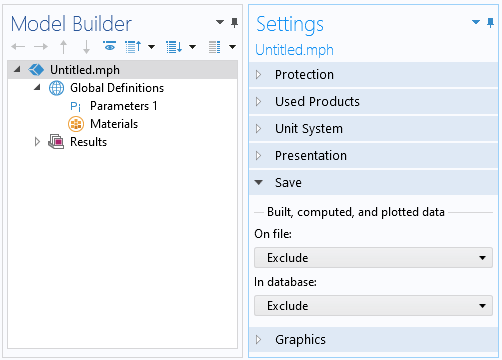
The Save options shown in the Settings window on the root node of a model. The defaults can be controlled in Preferences.
Submit feedback about this page or contact support here.